Summary
This article is about how to get started using the UCEditor plugin. It contains information on how to set it up after the plugin has been installed and how to create a first project.
We start of by assuming that you have successfully installed the UCEditor plugin. If you haven't, please refer to the documentation on how to install the plugin.
The eclipse help system can be accessed by using the main menu and clicking on Help or alternatively accessed online here
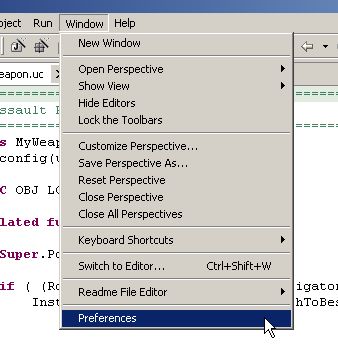
First of all it is important to configure the plugin. To do so, click on Window --> Preferences:

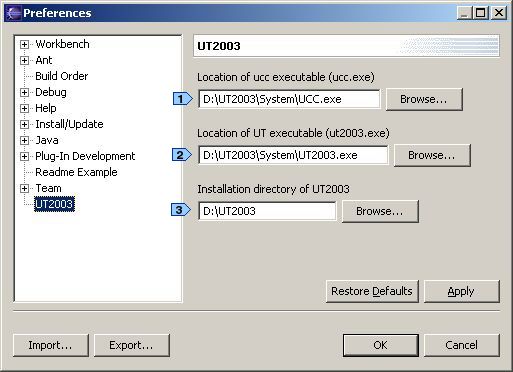
You should then see the preferences dialog. Fill in the required information.
The
fields you need to fill in are marked in the above picture.![]() should contain the location of the compiler, which is usually ucc.exe
located in the system path of your UT2003 installation. The field at
should contain the location of the compiler, which is usually ucc.exe
located in the system path of your UT2003 installation. The field at![]() should contain the location of the UT executable, that's the main program
to launch. It's located in the UT2003 system path as well and for UT2003 it's
surprisingly called ut2003.exe. At
should contain the location of the UT executable, that's the main program
to launch. It's located in the UT2003 system path as well and for UT2003 it's
surprisingly called ut2003.exe. At ![]() you should enter the main installation directory of UT2003.
you should enter the main installation directory of UT2003.
Press the OK
Button to store the settings and close the dialog.
Next, we will create a new project.
A project in eclipse is basically just a container
for storing resources in the same context. It also contains important information
just belonging to that specific project. Therefore each project can have its own
settings.
A project has a physical location which must be specific in the
project creation dialog. E.g. the project named "My
project" can have the location "D:\workspace\project1".
If you add a resource to the project called "NewClass.uc"
it will have the physical location of "D:\workspace\project1\NewClass.uc".
To get more information about eclipse projects, please consult the documentation or help that comes with eclipse.
How to create a new project? Simply invoke the project creation by either right clicking in the eclipse navigator and selecting New --> Project in the popup menu or in the main menu under File --> New --> Project. You should then see the New Project dialog:
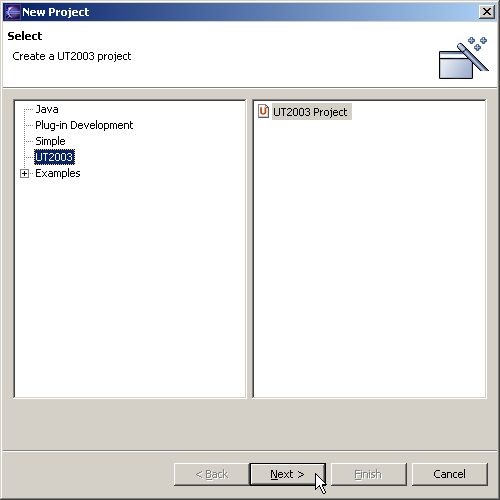
In the left box select the category UT2003. In the right box select UT2003 Project. Then click the Next Button to go to the UT2003 project specific settings:
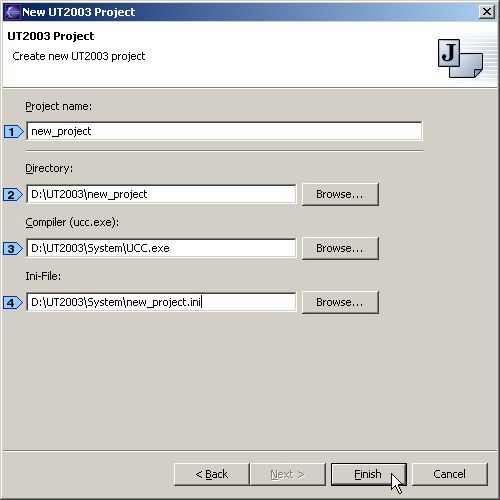
Fill in the required fields. Please note that you are able to change all of these settings later
At ![]() enter a name
for the new project. Usually the name can contain any characters, even whitespaces,
except some really weird characters. If the name is invalid or there is a name
conflict (typically when a project with the given name already exists) you will
get a warning message.
enter a name
for the new project. Usually the name can contain any characters, even whitespaces,
except some really weird characters. If the name is invalid or there is a name
conflict (typically when a project with the given name already exists) you will
get a warning message.
At ![]() you have to enter the project directory. This directory will be used to store
the contents in. If the name is invalid or overlaps with another project you will
get a warning message.
you have to enter the project directory. This directory will be used to store
the contents in. If the name is invalid or overlaps with another project you will
get a warning message.
At ![]() you have to enter the location of the compiler used for this project. This field
is automatically filled in by the location you have entered in the plugin preferences.
you have to enter the location of the compiler used for this project. This field
is automatically filled in by the location you have entered in the plugin preferences.
At
![]() enter the location of the
project's ini file. The ini file is usually a text file with the extensions .ini.
The ini file is used by UT2003 to start your project. Usually you simply copy
the ut2003.ini found in the UT2003 system directory and name it like your project.
E.g. copy ut2003.ini to myproject.ini. Please be careful that you don't accidentially
overwrite the original ut2003.ini! As a rule of thumb make a backup copy of
your whole UT2003 system directory first.
enter the location of the
project's ini file. The ini file is usually a text file with the extensions .ini.
The ini file is used by UT2003 to start your project. Usually you simply copy
the ut2003.ini found in the UT2003 system directory and name it like your project.
E.g. copy ut2003.ini to myproject.ini. Please be careful that you don't accidentially
overwrite the original ut2003.ini! As a rule of thumb make a backup copy of
your whole UT2003 system directory first.
Click Finish or press Enter to create the project and close the dialog. A new icon with your project's name appear in the eclipse navigator. This is your new project's root. Should you later wish to change your project's settings, just right click on the project icon in the eclipse navigator (the one with the project's name), select Properties and click on the UT2003 tab.
To create new class files, highlight your project and click on the main menu on File --> New --> Other (or in the project's context menu) and select Unreal Class File in the UT2003 category. This will create a new class file in the currently selected project.
I strongly suggest that you change the perspective for editing and launching a UC project. To learn more about perspectives and views please consult the eclipse documentation / help system.
The Java Perspective is a good starting point for editing and launching programs. This perspective also shows the debug and launch buttons and some other useful controls. To use the Java Perspective, click in the main menu on Window --> Open Perspective and choose Java.
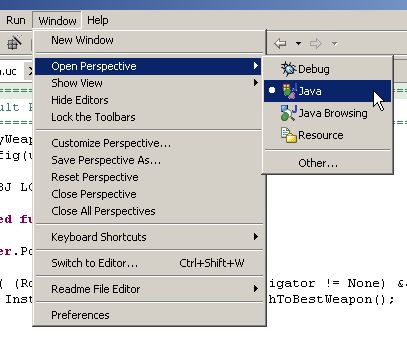
This
perspective will show some new icons in the toolbar:![]()
The little bug on the left is used for launching the project in Debug mode, the running man in the middle launches the program in running mode, that is non-debug mode and the little man on the right will launch external tools. Currently only the running man in the middle is interesting for us. Click on the little arrow right beside the button which will show a small pull down menu. Select Run... to bring up the Launcher Configuration dialog. You have to create a new launcher configuration initially which can then be used everytime you want to run the project. A launcher configuration is associated with a particular project.
To learn more about launcher configuration, please consult the eclipse documentation / help system. The eclipse help system can be accessed by using the main menu and clicking on Help or alternatively accessed online here
Copyright
(C) 2003 Thomas Meier.
Java and all Java-based
trademarks and logos are trademarks or registered trademarks of Sun Microsystems,
Inc. in the United States, other countries, or both.